Sending & Receiving "float" data - I2C bus
- Tasnemul Hasan Nehal
- Nov 17, 2020
- 4 min read
Objective:
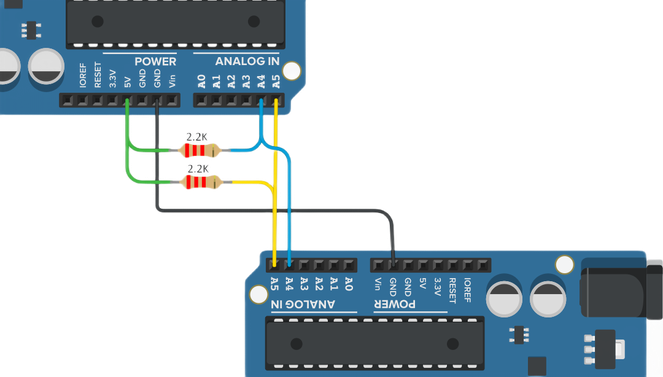
Here we will learn how to establish a I2C bus serial communication between 2 Arduinos and how both Master & Slave Arduino can send & receive "float"(ex: 34.23, 32.23) type data.
Theory:
Before we go for coding, we must know the basics of I2C bus and how it works. I highly recommend you to go through Scott Campbell's article on I2C bus to understand it better.
Hardware Setup:

Full Code:
ArduinoA (Master)
#include<Wire.h>                    //main library


void bytesToInt(byte b0, byte b1);  //converts incoming bytes to int
void intToBytes(int x);          //converts int to bytes before sending

int a;
byte sending[2];             //stores bytes that to be sent
byte coming[2];              //stores bytes that are coming


void setup()
{
 Wire.begin();           //only for master to create communication
 Serial.begin(9600);     //MCU & Serial Monitor communication starts
}


void loop()
{
    Wire.requestFrom(0x52, 2);
    while(Wire.available()>0)
    {
     coming[0]=Wire.read();                 //reads incoming 1st byte
     coming[1]=Wire.read();                 //reads incoming 2nd byte

     bytesToInt(coming[0], coming[1]);      //converts bytes to integer

     float f_coming= (float) a/100;         //integer to float
     Serial.println(f_coming);
    }


    float f_sending= 34.23;
    int x= f_sending*100;
    intToBytes(x);

    Wire.beginTransmission(0x52);         //start sending data signal
    Wire.write(sending[0]);               //sends data
    Wire.write(sending[1]);
    Wire.endTransmission();               //data sent complete
}


void bytesToInt(byte b0, byte b1)
{
  a = (b0 << 8) | (b1); /                 /bitwise operation
}
void intToBytes(int x)
{
  sending[0]= (x >>8);                    //bitwise operation
  sending[1]= x & 0xFF;
}
ArduinoB (Slave)
#include<Wire.h>   //main library

void bytesToInt(byte b0, byte b1);             //converts bytes to int
void intToBytes(int x);          //converts int to bytes before sending

int a;
byte sending[2];                   //stores bytes that to be sent
byte coming[2];                    //stores bytes that are coming

volatile bool flag=false;           //used to check if any data came


void setup()
{
  Wire.begin(0x52);         //slave address to call by Master
  Serial.begin(9600);       //MCU & Serial Monitor communication starts

  Wire.onReceive(getData);
  Wire.onRequest(sendData);
}


void loop()
{
  float f_sending=32.23;
  int x= f_sending*100;
  intToBytes(x);                        //converts integer to bytes


  if(flag == true)                      //data received done siganl
  {
    bytesToInt(coming[0], coming[1]);   //converts bytes to integer

    float f_coming= (float)a/100;       //integer to float
    Serial.println(f_coming);
  }


  flag=false;                           //reset
}


void sendData()
{
  Wire.write(sending[0]);               //sending data at request
  Wire.write(sending[1]);
}
void getData()
{
  coming[0]= Wire.read();
  coming[1]= Wire.read();
  flag=true;                        //helps to notify all data received
}


void intToBytes(int x)
{
  sending[0]= (x >>8);                  //bitwise operation
  sending[1]= x & 0xFF;
}
void bytesToInt(byte b0, byte b1)
{
  a = (b0 << 8) | (b1);                 //bitwise operation
}
Code Explanation:
At Master
void bytesToInt(byte b0, byte b1);We can not directly send/receive the "integer/float" type data from Slave. All Serial Communication is only possible with "byte" type data(ex: 0x12). So we first convert the float to integer then integer to bytes. Then only the bytes data is sent to Master Arduino. We created this user-defined function for receiving purpose which will take the incoming 2-byte type of data as input and convert those to one integer. So at the Master's monitor, we will see the same float data that was sent from Slave Arduino.
void intToBytes(int x);While sending we first convert the float to integer then integer to bytes. We created this user-defined function which will take an integer input then will split it into 2 data bytes. We use the Bitwise (>>, &) operators for this.
Wire.requestFrom(0x52, 1);Requesting Slave no-0x52 send 1byte data
byte n = Wire.requestFrom(0x52, 1);Requesting Slave no-0x52 send 1byte data. If the slave 0x52 is online on the bus, then n=1, not necessary any data to come. This value "1" is used to allocate memory space for incoming data.
byte n = Wire.requestFrom(0x52, 5);Here n=5. Which means the Master allocated 5 bytes of data where incoming data will be stored. Now if 2/3 bytes data comes then the rest of the memory location will be auto-filled with 0xFF (in decimal = 255)
while( Wire.available() > 0 ) Till there are data coming from Slave/data is available to receive, this loop will run to receive & store incoming data.
Wire.beginTransmission(0x52); In I2C bus protocol, its not possible to share (send & receive) data simultaneously. We have to complete one task first then do the next. if Slave is sending first then Master has to receive first & vice-versa. So here the "while( )" loop will keep receiving data until all data sending is done. Then with "Wire.beginTransmission(0x52)" the master will send a clock signal to Slave No-0x52 to tell that it will now start its data transmission,so be prepared to receive.
Wire.endTransmission(); This command will tell the receiver that no more data will be transmitted from now. The data transmission is ended. Now the receiver waits for another "Wire.beginTransmission(0x52)" to start receiving again.
At Slave
volatile bool flag=false;By using "volatile" we specified/fixed a memory location for "flag" which is a "bool" type variable, so next time when we need to access this variable compiler will know the exact location, the compiler won't need to reload and recheck variable's current/new memory location, unlike regular "int, float, char, bool" type variable because it's fixed. Learn more about it.
Wire.onReceive(getData); When the Master sends any data to this Slave, the "getData" function will run automatically to receive & store incoming data. This function works only for Slaves. Masters dont have these type of receiving function. "getData" is a regular function name, it can be replaced by any name that follows the Variable naming rules.
Wire.onRequest(sendData); When the Master asks to send any data by terminating "Wire.requestFrom(0x52, 1)" in the Master side code, the "sendData" function will run automatically to send the requested data. This function works only for Slaves. Masters dont have this type of sending function. "sendData" is a regular function name, it can be replaced by any name that follows the Variable naming rules.
Result:
Master's Serial Monitor Slave's Serial Monitor
See More Examples:


Comments